Opticabase Home is an add-on program to Opticabase Clinical so that staff can do home visits without the need for a connection to the internet.
- Computer = a computer in the office/practice
- Tablet = laptop or tablet being taken out of the office/practice
There are 2 options when using Opticabase Home away from the office/practice. Working remotely or coming to the office/practice.
Option 1: Going in to the Office with the tablet each day.
Before the visit(s)
- Opticabase Home should be opened on the laptop/tablet that will be taken out while it is in the office.
- Go into “Transfers for Optoms”
- Go into “Import Pxs from Opticabase”
- Choose Visit Date and Optom (Uses Optom and Exam date from Patient details in Opticabase)
- Check the list is correct. (*If the list isn’t correct then see instructions below)
- Click “Import Pxs”
- Close “import Pxs” window after “Imported” message.
- Close the next window to go back to the Main Screen and click on “Pxs for Exams” to make sure the Pxs are on the tablet.
- The laptop/tablet can then be used without internet connection for those Pxs that have been imported into Opticabase Home.
After the visit(s)
- Back in the Office staff can then go into “Transfers for Optoms”
- Then go into “Export Pxs back to Opticabase”
- View or email daily report and then click on “Transfer all back to Opticabase”
Deliveries and adjustments
A very similar process is used for staff doing deliveries except using the “Transfers for Deliveries” – uses delivery staff name and delivery date from Dispensing screen in Opticabase for opticabase Dispensing and Clinical (Practices that only have Opticabase Reception just enter the delivery date in the NHS Colln date in the bottom right corner of the patient details screen)
For eGOS3 forms to transfer, the GOS 3 BACK MUST be filled in Opticabase by clicking “Fill back” after the staff name and delivery date have been entered on the dispense screen.
Visits by non-Optoms such as Adjustments etc should be put on as a Dispense. Add dispense, Click on “other” along the top row of buttons and write the reason for visit in the Notes box (On the left, below the frame details section). A collection date will need to be entered and the member of staff doing the visit should be chosen above the collection date.
Option 2: Working completely remotely (ie. Optom not going into the office)
Before the visit(s)
- A member of staff should open Opticabase Home in the office.
- Go into “Transfers for Optoms”
- Go into “Import Pxs from Opticabase”
- Choose Visit Date and Optom (Uses Optom and Exam date from Patient details in Opticabase)
- Check the list is correct. (*If the list isn’t correct then see instructions below)
- Click “Import Pxs”
- Close “import Pxs” window after “Transferred” message.
- Click on “Pre-Visit Save to Dropbox”
Once dropbox has uploaded the file from the work computer and then downloaded it onto the Optoms laptop/tablet the Optom can import the Pxs: If the Optoms laptop/tablet is off when the Office uploads the file to dropbox then the Optom should wait about 5 minutes after turning on their laptop/tablet before continuing with the next steps.
- The Optom will can then go into “Transfers for Optoms” on their laptop/tablet
- Then click on “Optom Import Pxs” to import the patients for the day
- The Optom can then go into “Patients for Exams” when they don’t have internet connection and use Opticabase Home.
After the visit(s)
- At the end of the day the Optom will go into “Transfers for Optoms” and click on the “Optom Export Pxs” to save the data into dropbox for the office to retrieve
- Back in the Office staff can then go into “Transfers for Optoms”
- Then click on “Post-visit use Dropbox”
- Then go into “Export Pxs back to Opticabase”
- View or email daily report and then click on “Transfer all back to Opticabase”
Deliveries and adjustments
A very similar process is used for staff doing deliveries except using the “Transfers for Deliveries” – uses delivery staff name and delivery date from Dispensing screen in Opticabase
Visits by non-Optoms such as Adjustments etc should be put on as a Dispense. Add dispense, Click on “other” along the top row of buttons and write the reason for visit in the Notes box (On the left, below the frame details section). A collection date will need to be entered and the member of staff doing the visit should be chosen above the collection date.
* What to do when the import List isn’t correct before the visit
For Pxs NOT listed:
- Go into usual office Opticabase.
- Individuals: Find the patient’s patient details screen and make sure the Exam Date and Optom’s name is correct.
- Pxs at a Venue: Go into Homes, and then go into “Select Pxs”. Tick ONLY the patients whose exam date is not correct and then update their exam date using the button at the bottom of the screen. Then tick ALL the patients that are being seen at that home on that day and choose the Optom at the bottom of the screen and click to update it.
Pxs who are listed but shouldn’t be:
- Go into usual office Opticabase.
- Individuals: Find the patient’s patient details screen and remove the Optom’s name
- Pxs at a Venue: Go into Homes, and then go into “Select Pxs”. Tick ALL the patients that are NOT being seen at that home on that day but are listed on the tablet and choose a random Optom at the bottom of the screen and click to update it.
After correcting all these Pxs you go back on to the tablet and continue with step 4 above by choosing the Optom again (that will refresh the list with the changed Pxs)
Patients that will be imported into Opticabase Home for exams?
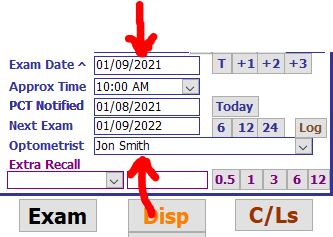
The import uses the Exam Date along with the Optometrist name on the patient details screen in Opticabase. eg. You choose “Jon Smith” as the Optometrist and “01/09/2021” as the exam date in Opticabase Home, that will import all patients who have have “01/09/2021” as the Exam Date and “Jon Smith” as the Optometrist on their patient details screen.
Patients that will be imported into Opticabase Home for deliveries?
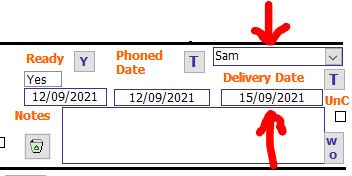
The import uses the delivery date on the dispense screen along with the staff name on the dispense screen in Opticabase, just above the delivery date. eg. You choose “Sam” as the delivery staff and “15/09/2021” as the delivery date in Opticabase Home, that will import all patients who have “Sam” as the deliverer at the bottom of their dispense screen and have “15/09/2021” as the delivery date on the dispense screen.
All Computers and tablets should have a folder C:\Opticabase\DomiData which holds 2 files, DomiTempData and DomiTempPxs